20th century manifold reconfigured for 21st century

General engine tech -- Drag Racing to Circle Track

Moderator: Team

inline6
Member
Member
Posts: 71
Joined: Thu Jan 08, 2009 10:04 am
Location: Armada, MI

20th century manifold reconfigured for 21st century

Post by inline6 »

Looking for some opinions on this reconfiguration on this manifold for this 6 cylinder. Trying to build a farm tractor that runs better then factory, that will pull occasionally and can still be used in the field for hours on end. I already have redid the piston design for quench, using LSX piston rings, and plan to have line to line coat the chambers and exhaust ports to minimize the heat in the head. My next task and this was suggested by a friend was to split the manifold. As you can see based on the firing order this pulse back and forth between front and back. Any thoughts or opinions on this or am I just crazy? I guess will it help efficiency? Any and all input is appreciated! [-o<

Thank you!
Scott
Slide1.JPG
Slide2.JPG
You do not have the required permissions to view the files attached to this post.
Tractor Puller, 1959 IH 460 with 430cid NA Alcohol Inline 6 started its life as a D282

The only replacement for displacement is RPM!
Schurkey
HotPass
HotPass
Posts: 1862
Joined: Sun Mar 01, 2009 2:42 am
Location: The Seasonally Frozen Wastelands

Re: 20th century manifold reconfigured for 21st century

Post by Schurkey »

Gotta keep the iron manifold?
inline6
Member
Member
Posts: 71
Joined: Thu Jan 08, 2009 10:04 am
Location: Armada, MI

Re: 20th century manifold reconfigured for 21st century

Post by inline6 »

Yeah that's the idea keep the iron manifold.
Tractor Puller, 1959 IH 460 with 430cid NA Alcohol Inline 6 started its life as a D282

The only replacement for displacement is RPM!
User avatar
Dave Koehler
Vendor
Posts: 7205
Joined: Mon Oct 04, 2004 11:19 pm
Location: Urbana, IL USA
Contact:

Re: 20th century manifold reconfigured for 21st century

Post by Dave Koehler »

What is keeping you from moving the new outlet in the picture further left?
Dave Koehler - Koehler Injection
Enderle Fuel Injection - Nitrous Charger - Balancing - Nitrous Master software
http://www.koehlerinjection.com
"Never let a race car know that you are in a hurry."
inline6
Member
Member
Posts: 71
Joined: Thu Jan 08, 2009 10:04 am
Location: Armada, MI

Re: 20th century manifold reconfigured for 21st century

Post by inline6 »

Dave Koehler wrote: Thu Sep 26, 2019 6:55 am What is keeping you from moving the new outlet in the picture further left?
I guess the convenience of milling that pad flat and utalizing the existing 4 holes. What were you thinking? A exit more between the left 2 ports?

Thanks,
Scott
Tractor Puller, 1959 IH 460 with 430cid NA Alcohol Inline 6 started its life as a D282

The only replacement for displacement is RPM!
User avatar
Dave Koehler
Vendor
Posts: 7205
Joined: Mon Oct 04, 2004 11:19 pm
Location: Urbana, IL USA
Contact:

Re: 20th century manifold reconfigured for 21st century

Post by Dave Koehler »

I have no science to guide you.
If you go to all the trouble to modify a cast iron manifold it just seems more logical to do something a little more symmetrical.
Dave Koehler - Koehler Injection
Enderle Fuel Injection - Nitrous Charger - Balancing - Nitrous Master software
http://www.koehlerinjection.com
"Never let a race car know that you are in a hurry."
rebelrouser
Guru
Guru
Posts: 1944
Joined: Tue Sep 15, 2015 2:25 pm
Location:

Re: 20th century manifold reconfigured for 21st century

Post by rebelrouser »

Years ago I helped a guy with a WD Allis Chalmers. We decked the block, had a crane cam ground. At that time the rules would not let us modify the manifold as you want to do, so I just tried to port it some. We had two things that messed with the project, first the tractor had a gravity fed fuel system, so two thirds of the way down the track it would start to run out of fuel. We were going to try pressurizing the fuel tank, but then they changed the rules and you had to run factory governed RPM, they checked it with a tach on the PTO shaft at full throttle. It made less power at stock RPM so we scrapped the project. Last couple of years at the fair, the farm tractors have a speed limit when hooked to the sled, if they go too fast while pulling the are disqualified. I guess just another way to hold the line on guys getting to exotic with their combinations. I enjoyed with projects like that over the years. I would think with the low rpm's most tractors run, simply porting the manifold may work better than splitting it, for making horsepower. Most of those manifolds are cast pretty rough, with lots of lumps and sharp angles. A little welding to allow a better radius on the bends should really pick up the flow.
enigma57
Guru
Guru
Posts: 1989
Joined: Sun Oct 07, 2007 11:59 pm
Location: Galt's Gulch

Re: 20th century manifold reconfigured for 21st century

Post by enigma57 »

Image

Scott, is this the heavy duty truck style 292 Chevy exhaust manifold (log manifold) having a single 3-bolt 2-1/2" outlet flange? I have one here. Was considering using it on the 292 inline 6 I am swapping into my '57 Chevy, but went another way.

If this is the manifold you have (or a similar design), its a Catch-22 situation. On the one hand, a single 2-1/2" exhaust pipe is large enough for a 291 cu.in. engine redlined at only 2,100 RPMs. However, its outlet placement not being centered can result in unbalanced internal pressure / flow, as (in the inverted mounting pictured) the rear 3 cylinders have no similar outlet to that of the front 3 cylinders.

Take a close look at the front half of the manifold. Note that the exhaust outlet is very nearly centered on #2 and #3 cylinders which share a single siamesed outlet. #1 exhaust outlet by contrast, has a single outlet port and the cross section of the exhaust runner carrying exhaust from this port to the exhaust outlet is sufficient.

Too bad the rear 3 cylinders were not handled in the same way (mirror image). The cross section of the exhaust manifold through which all 3 rear cylinders discharge is only marginally increased where cylinders #4 and #5 share a single siamesed outlet and all 3 rear cylinders must flow past this point of restriction to the single outlet centered on #2 and #3 cylinders. Not to mention that besides not providing even flow for all 6 cylinders, the point at which flow from rear to front and from front to rear meet becomes a train wreck where both collide at the single outlet provided.

The best way I can think of to allow the rear 3 cylinders to have the same flow capacity as the front 3 cylinders would be to weld on a second 3-bolt 2-1/2" outlet flange directly centered on #4 and #5 cylinders. You can machine one from scratch, but I have found that the repro cast-iron heat riser eliminators (big block Chevy application) will work well for this. Here are some new ones currently listed on E-bay if you don't have a good used one laying around the shop......

https://www.ebay.com/sch/i.html?_nkw=bi ... 0&_fosrp=1

If you go this route, weld or braze one of these onto your manifold centered on #4 and #5 cylinders. These heat riser eliminators are about 1" to 1-1/8" thick, same as the heat risers they were designed to replace.

Note: I am not affiliated with the seller whose business card you see in the photos below and receive no kickback from him. That's why I gave you the link above which shows all current e-Bay listings for these and for the heat risers they are designed to replace. I will say that when I did my own manifold, I used his flanges and found them to be good quality pieces. At that time, I could not find heat riser eliminators I felt had enough material around the bolt holes to tap without being concerned about cracking at the outer edge...... So I did it the old way...... Picked up a pair of the heat risers (I needed 2) and removed the blade and shaft and brazed the shaft hole closed when brazing them to my manifold......

Exhaust flange side......
Image

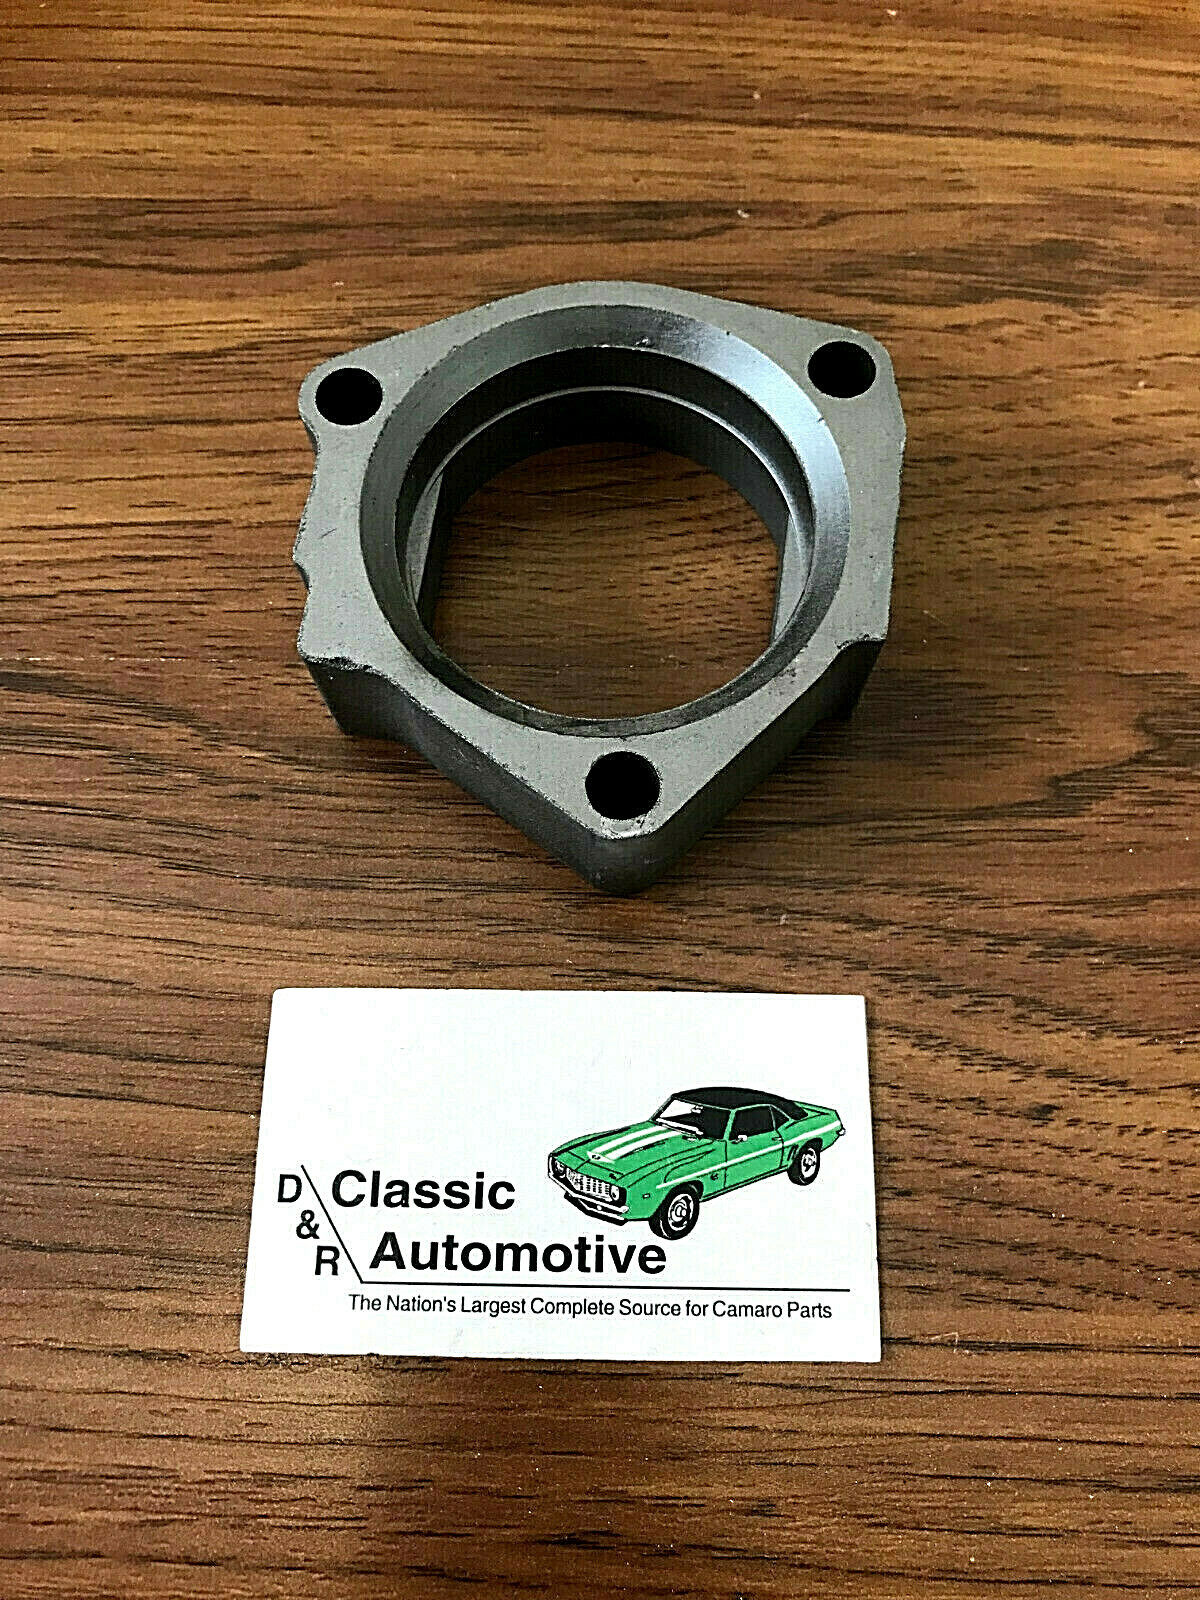
Bottom side you weld or braze to your exhaust manifold......
Image

Side view showing thickness......
Image

Holes for the 3 flange bolts are large enough to slip over 3/8" dia. studs. You can either heli-coil them for 3/8" X 16 thread or tap them for 7/16" X 20 thread (be careful, the metal is thin here at outside edge) and use a 7/16" X 3/8" stud like a GM rocker arm stud. Then bore down through the center and open the outlet for your new flange into your manifold.

Regarding the heat riser hole at the center of your manifold...... You can simply close it off with a blanking flange. If you want to 'split' the manifold and isolate the front 3 cylinders from the rear 3 cylinders, you can weld a piece of 1/4" thick iron at right angle to your blanking flange so it extends into the log manifold (like a 'tongue') and carefully trim it so it fits with say 0.030" clearance on the 3 sides not welded when blanking flange is bolted in place.

I believe you will come out better and with more equal flow from each cylinder if you leave the 'splitter' out and allow the log manifold to remain open for its entire length inside. Only way to know whether a 'splitter' will help is to take the extra time and effort to make one and compare performance with it and without it. In the '40s and '50s, it was common practice to cut the manifold in half, remove a small amount from he middle and weld a blanking plate on each of the (front and rear) manifold halves. You can also do it this way if you have a mind to.

Which ever way you elect to go (splitter' or no 'splitter')...... This will give you plenty flow volume for what you are doing and you can either run the two 2-1/2" exhaust pipes as duals or join them together and run a single 3" exhaust. Be sure and run between 15" to 18" of 2-1/2" pipe from each exhaust outlet before either terminating them or joining them together and increasing to a single 3" pipe.

Regarding tri-y or 3 into 2, then 2 into 1 headers...... That is a whole 'nuther thing. You can use PipeMax for that and if correctly sized, you can make good power. But those calcs don't apply if you are going to retain your log manifold and modify it. Once your exhaust dumps into your log manifold, there is no sizing and setting length for individual primary pipes as you would have with tube headers. With your log manifold, the challenge becomes...... Equalize flow between all 6 cylinders as much as possible internally and then make sure your exhaust manifold outlets are sized sufficiently not to restrict flow.

If you do elect to build tube headers from scratch, contact Larry Meaux and ask his opinion on how best to handle your 2 sets of siamesed exhaust ports. Can they be split so you can run individual tubes of same size for all 6 cylinders...... Or will you need to run a single larger dia. tube for each of your 2 sets of siamesed cylinders...... Each siamesed set of exhaust ports having equal internal volume to 2 single tubes of correct dia. and length such as you would use for #1 and # 6?

Good luck with your project and please keep us informed as to your progress.

Best regards,

Harry
User avatar
Dave Koehler
Vendor
Posts: 7205
Joined: Mon Oct 04, 2004 11:19 pm
Location: Urbana, IL USA
Contact:

Re: 20th century manifold reconfigured for 21st century

Post by Dave Koehler »

Great Post Harry!
IF I am ever forced into such a project I now know where to begin.

I might add that if some construction material is needed McMaster keeps some cast iron in stock.
https://www.mcmaster.com/cast-iron
Dave Koehler - Koehler Injection
Enderle Fuel Injection - Nitrous Charger - Balancing - Nitrous Master software
http://www.koehlerinjection.com
"Never let a race car know that you are in a hurry."
enigma57
Guru
Guru
Posts: 1989
Joined: Sun Oct 07, 2007 11:59 pm
Location: Galt's Gulch

Re: 20th century manifold reconfigured for 21st century

Post by enigma57 »

:D Thanks, Dave! I'll make a note of that. Never occurred to me McMaster Carr would have cast-iron in their inventory. Good to know.

When I retired 9 years ago, I had to downsize and only kept what would fit in our little suburban garage. Hand tools, mostly. I went with the cast-iron heat risers because they were cast material similar to my manifolds, already machined and could be had for a reasonable price. That way, I was able to braze them onto my exhaust manifold outlets with yellow brass rod and the only machining will involve some straight forward drilling and tapping I can do here at home (and if the gasket sealing surface where they bolt to the head is warped from the heat, I will have a machine shop take a skim cut and true it up).

Best regards,

Harry
inline6
Member
Member
Posts: 71
Joined: Thu Jan 08, 2009 10:04 am
Location: Armada, MI

Re: 20th century manifold reconfigured for 21st century

Post by inline6 »

Harry,
Thank you for the reply. It is actually a 2 flange and that is a interesting idea of adding a equal exit that Dave had suggested in the previous post. I am just really wondering if its worth all the trouble? But it really makes sense if I'm going through any changes to go this route. This is a vertical exhaust and with the second outlet moved back I run into fuel tank interference unless it makes a immediate bend forward. Here is another picture from another angle showing the angles of the runners and the 2 bolt top flange.

I have to add that this engine in stock form at 263cid I have done some testing with this truck manifold see attached picture, in the past. I used a PTO dyno and it did not like that manifold at all, lost hp. Granted it did not have a pipe on it but I did expect it to pick up some hp at some rpms as it looks like a nice piece. So this is where velocity to me is critical and confirms bigger is not always better.

Thanks again,
Scott
Screenshot_20190929-174253_Chrome.jpg
Screenshot_20190929-191210_Chrome.jpg
You do not have the required permissions to view the files attached to this post.
Tractor Puller, 1959 IH 460 with 430cid NA Alcohol Inline 6 started its life as a D282

The only replacement for displacement is RPM!
User avatar
modok
Guru
Guru
Posts: 3323
Joined: Sun Jun 06, 2010 1:50 am
Location:

Re: 20th century manifold reconfigured for 21st century

Post by modok »

Splitting the manifold will always work better, no doubt.
When does it not? never

only time it does not is if the tuning is way off. You will need to try a few different diameters and lengths of downpipe to see what it likes best. or, whatever you want to call them, they don't go down.....but IMO they are still downpipes.

but more like,.......19th century design :lol: , bringing it op to 1980's tech
User avatar
Dave Koehler
Vendor
Posts: 7205
Joined: Mon Oct 04, 2004 11:19 pm
Location: Urbana, IL USA
Contact:

Re: 20th century manifold reconfigured for 21st century

Post by Dave Koehler »

Is there some rule that says you must run a cast iron manifold?
A dangerous thing but I was thinking it would almost be easier to make a new manifold from steel tubing.
If that is an acceptable thing to do I would make the collector come out wherever it needs to be.
I would then get my favorite sheet metal guy to fill in the old hood hole and make a new one.
Pull it off just right and the other boys will have to look twice to see the change.
Plus it would make them crazy even if it did nothing.

IF I could get away with it I would be tempted to consider zoomies. Probably no gain in this app but it would make them crazy.

For inspiration one should probably dig way back and find what Mr 6 cylinder, Kay Sissel was doing with manifolds.
Kay is gone now but the biz survives.
http://www.sissellautomotive.com/index.htm

Using google to search for 6 cylinder header images there is a fair amount out there. Pretty much down headers but think upside down and there might be some ideas worth implementing.
Dave Koehler - Koehler Injection
Enderle Fuel Injection - Nitrous Charger - Balancing - Nitrous Master software
http://www.koehlerinjection.com
"Never let a race car know that you are in a hurry."
inline6
Member
Member
Posts: 71
Joined: Thu Jan 08, 2009 10:04 am
Location: Armada, MI

Re: 20th century manifold reconfigured for 21st century

Post by inline6 »

Yes I am supposed to stick with a stock manifold, I may raise some eye brows if it has a fabricated header. A modified chevy iron manifold I think I may be able to get away with. Also the reason I wanted to modify the top of this manifold is it is not easily seen it is above the sheet metal line, the bottom of the manifold is not though.
Yes I have looked at Langdens Stovebolt website and others this led me to 12 bolt as the chevy seems to be the closest match and there is at least one company that offers a split manifold.
Thanks,
Scott
Screenshot_20190930-081438_Chrome.jpg
You do not have the required permissions to view the files attached to this post.
Tractor Puller, 1959 IH 460 with 430cid NA Alcohol Inline 6 started its life as a D282

The only replacement for displacement is RPM!
Truckedup
Guru
Guru
Posts: 2728
Joined: Mon Jan 21, 2013 2:41 pm
Location: Finger Lakes

Re: 20th century manifold reconfigured for 21st century

Post by Truckedup »

inline6 wrote: Wed Sep 25, 2019 10:21 am Looking for some opinions on this reconfiguration on this manifold for this 6 cylinder. Trying to build a farm tractor that runs better then factory, that will pull occasionally and can still be used in the field for hours on end. I already have redid the piston design for quench, using LSX piston rings, and plan to have line to line coat the chambers and exhaust ports to minimize the heat in the head. My next task and this was suggested by a friend was to split the manifold. As you can see based on the firing order this pulse back and forth between front and back. Any thoughts or opinions on this or am I just crazy? I guess will it help efficiency? Any and all input is appreciated! [-o<

Thank you!
Scott
I did't think anyone still used gas tractors for serious farm work other than pulling wagons.......I would be leary of the durability of using a welded cast iron manifold on an engine spending hours at high power loading..
Motorcycle land speed racing... wearing animal hides and clinging to vibrating oily machines propelled by fire
Post Reply